Inside
WI
> Biocomputing >
Graphics > FreeHand
FreeHand
9
Organization
Before
you get started in FreeHand, it is a good idea to organize your window
and make choices about preferences and defaults. To work effectively
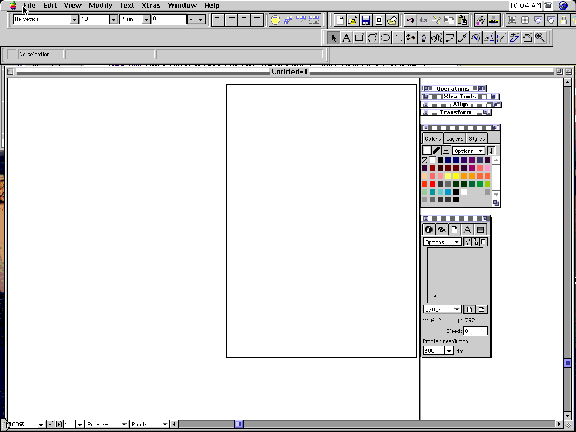
in FreeHand, it is necessary to have the palettes below accessible at
all times. I like to keep them zipped at the right of my document. In
File > Preferences > Panels, you can check a box marked "remember
locations of zipped palettes". That way each time you zip a palette
closed (click right-hand corner) it will go back to the location you
gave it to the side of your document. This is a great feature. Try it!
Go
to the Window menu to find the palettes shown below.
Changing/Saving
default styles .................back
to top
FreeHand
opens each new file based on the FreeHand Defaults file. You alter the
default styles by opening a new document and setting the font, type
size, colors in the color palette, whatever panels you want to appear
on the desktop and their locations, page size, orientation, line weight,
etc. When the file is exactly how you would like it to be when you open
it each time, save it in the FreeHand folder on your hard drive
with a name you can remember later.
Next,
go to Preferences > Document. In the space labeled "New
Document Template" type the name of the default file you just created.
Be sure to spell it exactly the same as the name of the file you created.
Now whenever you open a new document, your default file will be used.
***
There are now two ready-made defaults available on Applications: one
is called "prints" and one is called "slides". If
you drag these into your Freehand folder on your hard drive, and then
go to Preferences > Document, you can type in either "prints"
or "slides" to use one of these for your default settings.
Viewing
the page..................back
to top
Magnification
 When you have selected this tool from the toolbox, you can click the
mouse in your document to change your view of the page. If you draw
a selection box with it, the area you select will be magnified to fill
the screen. Holding option while clicking will decrease the magnification.
View
> Fit to Page will always let you go back to the full view
of your document.
View
> Custom > New will allow you to save the current view
so that if you zoom in or out or to a different part of the document,
your custom view can be regained by just choosing it again.
Palettes
.............back
to top
Most
of the functionality of Freehand is in the Palettes. Here are in order
of importance, labeled and named for your reference:
Toolbox
..................back
to top
 Inspector
Palette. This
window holds five panels:
Object
Inspector (information on selected object)
Stroke
(lines)
Fill
(gradients and transparency)
Page
(Size/Orientation/multiple)
Text
(font, size, effects, etc.)
Align
Transform
Color
Layer
Styles
Xtra
Operations (can be found under Windows > Toolbars )
Xtra-Tools
(can be found under Windows > Toolbars )
Working
with files from Photoshop................back
to top
Importing an image | Managing
links | Fixing broken links | Editing
images | Cropping images
Importing
an image:
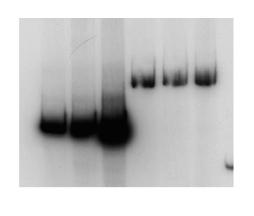
Save
Photoshop files in TIFF format. (Note that all layers must be flattened
to save as TIFF).
1.
Go to File > Import.
2.
Select the correct image from the disk.
3.
Click to place the image.
|
 |
Managing
Linked file...............back
to top
Imported
files will be linked by default;
that is, what you
will see in Freehand will be a preview with a pointer to your original
Photoshop TIFF. When you print, the data from the Photoshop TIFF is
sent to the printer. If you change the location of the TIFF after importing
it into Freehand, the link will be broken.
(You can choose to embed an image by selecting it in the Links dialog
box below and clicking on "embed". The quality of the image
may decrease somewhat but may stay the same depending on the image.
The advantage is that you don't need to worry about losing the link
to an embedded image.)
Fixing
broken links Go
to Edit > Links

In this window
you will see all the image files you have imported into your document.
If the image is listed as missing, you need to click the change button
to update it.
Editing
a Photoshop file from within Freehand ..................back
to top
The easiest
way to edit a TIFF placed in a Freehand file is to open the Photoshop
file from within Freehand To do this:
1. Select
the Image
2.
Go to Edit > External Editor. The first time you will have
to choose the program you want to open (Photoshop), but after that,
it will automatically open your imported
images in Photoshop.
3. Edit
your image
4.
Save your image in Photoshop.
5. Click
"Done" and the image will automatically update in Freehand
Cropping
imported images ..................back
to top
|
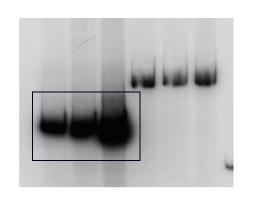
1.
Draw a box (with no fill color) around the area you would like
to crop
(see
drawing)
|
 |
| 2.
Select the image and use Command-X to cut it from the document onto
the clipboard. |
 |
| 3.
First select the box and then choose Edit > Paste Inside.
The image you cut will be pasted inside the box you drew. |
 |
|
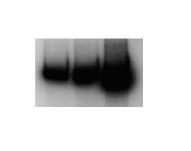
4.
Now you can get rid of the black line around the image by selecting
the box and choosing no fill for the line color
(See
Drawing)
|
 |
|
5.
To move the image within the cropping box, click on it. You will
see a blue symbol in the middle. Click and drag on this.
To move the whole box without moving the image inside, click anywhere
else on the box.
Note:
To make sure the image and the box move together, check the
move tab in the Transform palette and make sure "contents"
is checked.
|

|
Commands
..................back
to top
Undo | Redo
| Select | Group & ungroup
| Send to front or back | Align
| Duplicate | Resize | Rotate
Publish
as HTML | Anti-Alias | View
Custom Units
 Undo:Command-Z.
This is the most important command
to know. You can set the number of undos under File > Preferences.
The default is 100. Each undo uses memory, so you can set it lower if
the program begins to run slowly, or higher if the program is running
well.  Redo:
Command-Y.
 Selection:
...........back
to top
Click with
the pointer tool on an object or draw a selection box with the pointer
tool around an object to make a selection. When objects are selected,
you can move them anywhere on the page with the pointer tool releasing
the mouse button when you want to release the objects.
Selecting
multiple objects: Hold the shift key down and click on multiple
objects.
Selecting
one object behind another: Hold down control while clicking on the
object in front. First the object in front will become selected. Click
again, and the object in back becomes selected. If you want to select
them both, hold down shift as you do this.
Deselecting:
Hitting tab or double clicking on an empty part of the page will deselect
all objects. Tab is often easier if you have a background on your page,
because this tends to become selected all the time. If you have trouble
selecting an object, hit tab and try again; some object elsewhere on
the page is probably selected. Group
and Ungroup: ...............back
to top
When you are
working with a lot of objects, it is sometimes convenient to lock a
group of them together so you can move them as one. The "group" command
allows you to do this. Command-G. Also Modify > Group.
To ungroup them, hit Command-U. Also Modify > Ungroup.
Grouped
objects can be edited in Freehand without ungrouping them. To select
an object within a group, hold down the option key and select it with
the pointer tool. While the object is selected you can modify it, and
when you deselect it, it will remain in its original group Send
to Front or Back:.............back
to top
Modify
> Arrange.
When you select an object you can send it to the front (command-F) or
to the back (command-B).
 Subselect lasso: You can use this tool to
make complex selections that won't work well with a rectangular selection
box. Double click for options:

Align:
...............back
to top
This palette
is essential for helping you align objects on a page to each other and
to the page. This symbol means you are going to line the objects up
on the top or bottom edge, or to the middle on the horizontal axis .
This symbol means aligning to the left, right, or middle on a vertical
axis. (Alignment
Palette) Duplicate:
..............back
to top
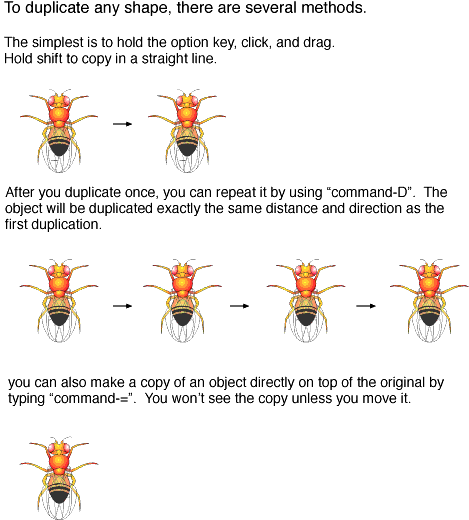
There are
several ways to duplicate an object:
1.
Clone: "Command-=". This
creates a duplicate of the object directly
on top of the object (so you won't be able to see it until you move
it).
2.
Option Key: Select the object you want to duplicate, hold down the
mouse button, hold down option, and drag. To copy in a straight line,
hold down mouse, option, and shift, and then drag.
3.
Duplicate: Command-D. This creates an offset duplicate
of the selected object. If you use this or the clone command, then move
the copy to its desired location, you can use the Duplicate command
again to create another copy the same distance and direction away from
the previous copy.
 Resize:
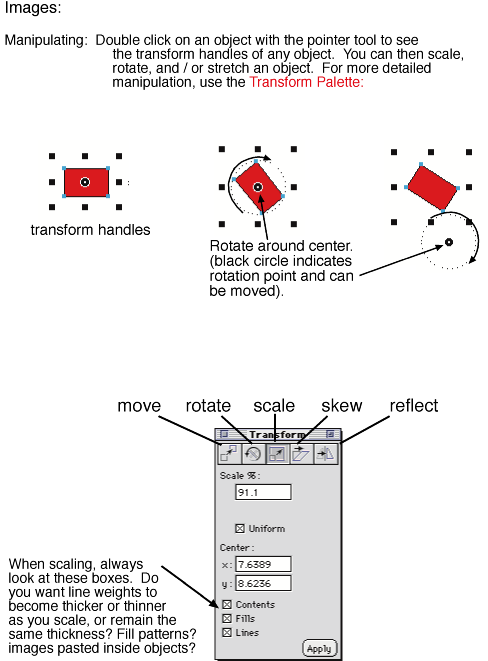
If
you double click an object, small black squares called "transform handles"
appear on all sides of the object, indicating that you can transform
it. Clicking and dragging on the side boxes will stretch the object.
If you move the cursor over the corner, you will get a diagonal arrow.
Holding shift and dragging will allow you to scale the object proportionally.
Look at the transform palette to decide if you want to scale the lines
and fills of an object as well as its size. (This palette gives you
more options for transforming and will also allow you to make a more
precise transformation by plugging in values.)
 Rotate: Double
click on an object. Transform handles appear. If you move the cursor
outside the box a the corner, you will see a rounded arrow. This means
you can rotate the object by clicking and dragging. The transform palette
allows you to rotate with more precision by plugging in values.
Publish
as HTML: If
you go to File > Publish as HTML you can save your entire
page as a web page. Each image, object and text block will be saved
individually so you can edit the page in an HTML editor such as Dreamweaver,
Claris Homepage or Go Live. It actually works very well! Anti-Alias
View:
On
the View menu and at the bottom of the FreeHand window, you can now
preview your art as it will look when printed (smoothes jagged edges)
or in an anti-aliased medium. Custom
Units:
Usually you want
to set the document to inches or centimeters, while lines and text are
measured in points. To avoid switching back and forth constantly, you
can now type these codes into any window to specify units, regardless
of what kind of units the document is set to ( your number goes instead
of #):
inches:
#
points: p#
picas: #p
millimeters: #m
centimeters: #c
pixels: #x
Drawing.................back
to top
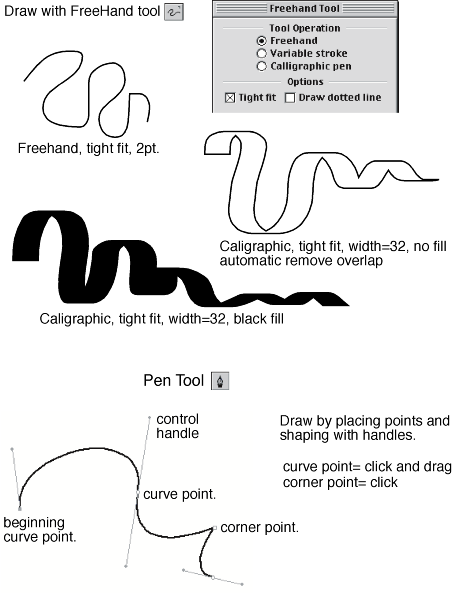
Drawing
Tools | Operations Palette | Knife,Mirror,Envelope
| Find and Replace | Freeform
Tool | Blend Tool
Mirror
Tool | TraceTool | Perspective
Tool | Layers | Styles
Using
the Operations Palette:..................back
to top
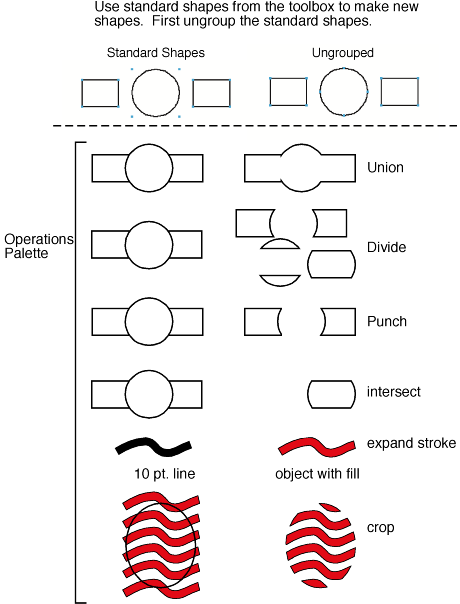
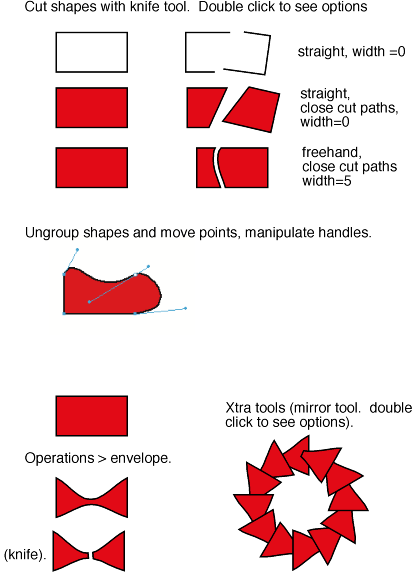
Instead of
trying to draw from scratch, it can be easier to start with the standard
shapes and manipulate them. Do do this, you need to ungroup the standard
shapes first. Then you can select and move the points or combine
the shapes with these features found in the Operations
Palette.
Knife,
Mirror, Envelope..................back
to top
Find
and replace: Edit
> Find and Replace. .................back
to top
This tool
helps you find elements in your document that you want to change. You
can choose to find and replace text or graphics.
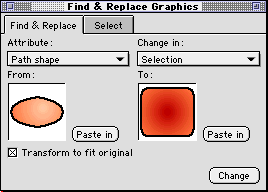
The text
window lets you type in characteristics of text you want to find, and
what you want to replace it with.
For the
graphics panel, you have a choice of simply selecting objects that you
specify, or finding and replacing objects. The first step is to highlight
one object representative of the many you want to find. You can search
by many criteria, such as color, path shape, blend steps, etc. Searching
by path shape even allows you to paste in a path to find and one to
replace it. (Example above). Do do this, just use command-c to copy
an object from your image and click the "paste in" box in
the find and replace window. Freeform
tool .................back
to top
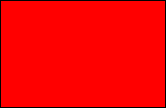
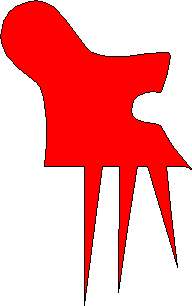
The freeform
tool allows you to alter the shape of an object without selecting points.
When moving the tool over a selected object, it changes between push
and pull form. When it passes over a line, it becomes a pull tool. If
you click on a line and drag, you can pull a point out of the line.
Use the arrow keys on the keyboard to make the area of the selection
larger or smaller. On the outside of a line, the freehand tool becomes
a circle with which you can push the form to change its shape. The circle
becomes bigger or smaller by using the arrow keys.
 |
 |
| Beginning
with an ungrouped rectangle you can make any interesting shape with
the freeform tool: | In just
a few seconds the pushing and pulling of the freeform tool has created
a new shape. |
 Blend
tool.................back
to top
Blend the
shape and color of one object to another. Look at the object inspector
to choose the number of blending steps. Remember, if you are using preset
shapes such as rectangles or circles, you need to ungroup them first.
 |
 |
 |
| Begin with
two shapes. Select them both and click on the blend tool in the Operations
Palette. | The object
inspector has a place to type in how many blend steps you want. This
one has five. | Here is
the same blend with 25 steps. |
 |
 |
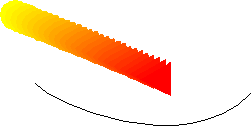
| You can
make the blend take a shape by attaching it to a path. Here is a blend
with the path drawn. | Select
both blend and path and go to Modify > Combine > Join Blend
to Path. |
 Mirror
tool: Select
one object and make a circle of objects using this tool. Useful in making
virus coat proteins. You can specify the number of objects in the circle,
and control the diameter of the circle. You can also rotate the objects
as they form a circle. It can also be used to reflect just once by specifying
only one object.
  Trace
tool:
Traces
a scanned or vector objects. Great for tracing graphs.
Trace
tool:
Traces
a scanned or vector objects. Great for tracing graphs.
 Perspective
Tool: Now
you can make any of your objects conform to a perspective grid. Follow
these steps to use the tool:
1.
Turn on Perspective grid by choosing View > Perspective Grid
2.
Select an object with the Perspective Tool  (in the Toolbox.)
3.
With the mouse button pressed, use the arrow keys on the keyboard to
indicate which side of the grid to snap the object to.
4.
To make a custom perspective grid, go to View > Perspective Grid
> Define Grid
 Layers:
Click here to see how to
use the layers palette.
Layers are useful for drawing, especially if you have a scanned-in drawing
that you are planning to trace in Freehand, if you are using a background
that keeps getting selected, or if your image is so complicated that
it is hard to select the parts you want to change. You can also turn
layers on and off if you want to hide part of your image while you are
working.
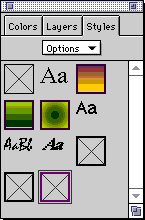
Styles:
Styles
are formatting attributes that can be saved and applied to text paragraphs
or graphics. You can save information such as stroke, fill, and color
for graphics, and font, size, alignment, etc., for paragraphs. The styles
menu is in the same palette as color and layers. To save a new style,
select the text or graphics with the attributes you want to record.
Then choose new from the styles menu. It will ask you to name the style.
This tool can really save you time.
Text...............back
to top
Text palette | Text blocks | Converting
to paths
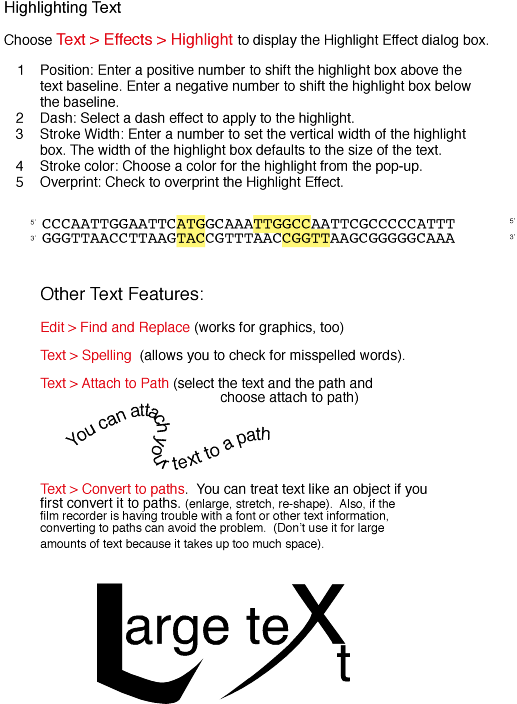
See Text
Palette for basics on using text, changing size, font, etc..
#000066Text
blocks can be fixed or auto-expanding. Use the text tool to draw a fixed
text box. In this format, text wraps automatically. Hold down control
while you draw to make an expandable text block. You can also make an
expandable text block by using the text tool to click in the document
and type.
More
Text Effects:
Converting
Text to Paths..................back
to top
By
going to Text > Convert to Paths,
you can turn text into an object. There are three situations in which
you might benefit from doing this:
1. If
you are using a font that won't be available
on the computer you plan to print from, you can convert all the text
to paths. Then the font will no longer be necessary. Keep in
mind that once a font is converted to objects, it is no longer editable
as text.
2. You
are having imaging trouble on the film recorder, text moves around or
disappears. Converting everything to paths will avoid some of these
problems.
3. You
want to change the shapes of the letters. In the example below, I converted
the text to paths, ungrouped the letters, and then moved individual
points around to change the shapes of the letters.
 |
bb |
 |
| Text
becomes just grouped objects when you convert it to paths. If
you ungroup the objects, you can edit them: |
|
By
moving and manipulating points, you can treat create interesting
letter shapes. |
Working
with Color ..................back
to top
Mixing colors
| Color matching | Printing
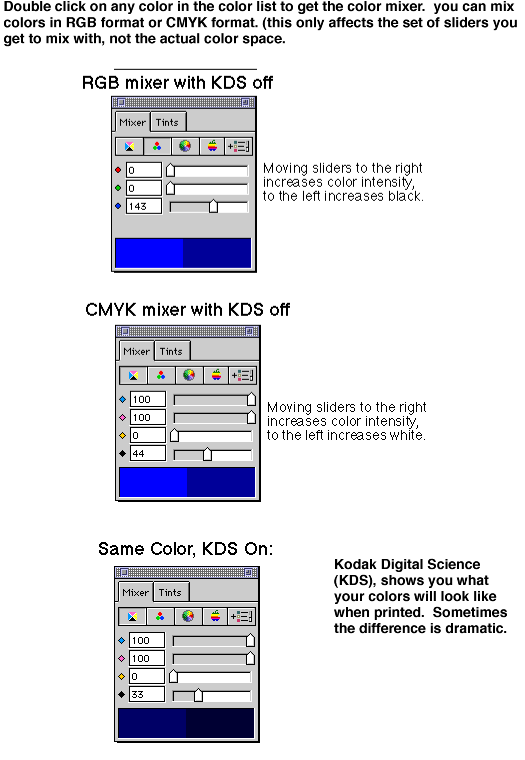
The color
palette in Freehand comes with some basic colors. By clicking on "Options"
you can access many color libraries. By holding shift while you select
colors from these libraries you can add the colors you choose to the
color palette.
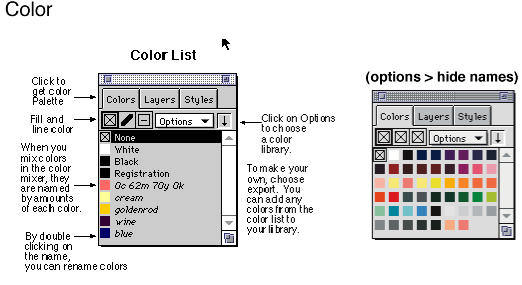
Mixing
Colors
Color
Matching..................back
to top
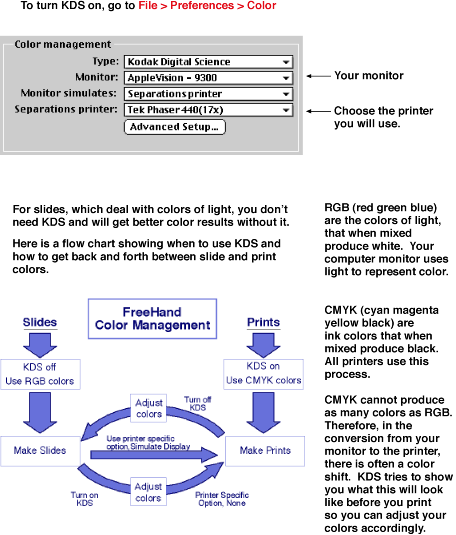
Freehand comes
with Kodak Digital Science, a technology that alters the colors on your
screen to simulate the colors you will see when you print. The difference
can be surprising. You can turn this feature on and off depending on
whether your final output will be prints or slides in File > Preferences.
Printing................back
to top
When you print,
there are a couple of things to check.
1.
File > Page Setup.
Make sure the page size and orientation are correct.
2.
Scroll to the Freehand settings
and look at the print settings. The box marked"Use PPD" should
be checked, and the printer you are using should appear next to that.
This is not the same as choosing the printer. If a black and white
printer appears here, the print will be in black and white even if you
are printing to a color printer.

Note that
you can scroll in the box marked "scale %" to Fit to Paper
if you want to shrink the image to fit if it runs off a little.
Check
the tile box if the image is too big to fit on one piece of paper
at full size.
3. Click
"Print".
back to
top |

