Updated
7/12/05
Move
Tool
Measure
Tool
Magnetic Lasso
Freehand
Pen Tool
Magnetic
Pen Tool
Reselect
Transform
Selection
Grid
and Guides
Layers
Type
Adjustment
Align
Layer Effects
Merge Down
Actions
Creating
Applying to a folder
History Palette
Linear History
Nonlinear History
History Brush
Maximizing Space
Limitations
Channel
Mixer
|
|
Inside
WI > BaRC
> Graphics > Photoshop
> Photoshop Tools
Photoshop
Tools
Move
Tool 
The
move tool allows you to move objects. You can select layers with it,
so if each of your objects is on a separate layer, this tool will move
those objects just by clicking on them and dragging.
But
if more than one object is on a layer, you need to first make a selection
with the Marquee tool 
and then move it with the move tool. This means that you must either
switch tools or press the command key, which changes the marquee
into the move tool. To copy a selection, press command + option.
To move in a straight line, press shift. Always click the mouse button
last in this sequence.
Measure
Tool
 .............Back
to top
Lets
you measure length, width, angle and location of areas in your image.
If you scan something in a little crookedly, use this tool to measure
the angle and then use "rotate canvas" to correct the rotation by the
exact amount. To measure, choose the measure tool from the tool box.
(It looks like a little ruler). Draw a line with it, and look at the
info palette to see the angle, width, length and coordinates of your
line. When you double click on the page, the line will disappear. Then
go to Image > Rotate Canvas > Arbitrary. The amount of
rotation needed to make a 90 degree angle will automatically be computed.
Click OK.
Magnetic
Lasso  .............Back
to top
For
shapes that contrast with the background, this tool will snap to the
edge when making a selection. Double click on the magnetic lasso icon
to open the dialog box. You can set the strength of the "magnet" by
entering values in the dialog box. Frequency
is the rate at which the lasso will fasten points. Enter a rate between
0 and 100. Lasso width determines how far the lasso will reach to find
a high contrast edge. Enter a number between 1 and 100.
Edge
contrast
tells the lasso how to distinguish the desired edge from other pixels.
A high value detects only images with sharp contrast to the background.
A lower value detects low contrast images. On images with a well-defined
border, you can use a wider lasso width and a high edge contrast, and
you don't need to be precise when tracing. On a border with fuzzier
edges, you should use a smaller width, lower edge contrast, and trace
more carefully.
If you make a mistake and want to stop drawing, hit escape.
Freehand
Pen Tool  .............Back
to top
This
is like the pen tool in any of the other drawing programs. Anchor points
and use handles to make shapes. Click and hold on the pen icon in the
toolbox to see an array of pen tools. The arrowhead on the end is the
vector selection tool. You can use it to select points drawn with the
pen tool.
The
lines themselves are vector, and won't print out. If you want to see
that shape print, you need to apply a fill or a stroke to the path.
To
apply a fill, click on the fill path button at the bottom of the paths
palette.
To
stroke a path, select the painting tool you want to use, specify a brush
from the brush palette (Window > show brushes) and choose
"stroke path" from the Paths palette menu (window > show paths).
You can also click the stroke path button at the bottom of the paths
palette. Each click of the button makes the path thicker.
This
tool is also great for making a smooth selection. Just draw as you normally
would with the pen tool, and then choose Make Selection from the Paths
palette menu or click the make selection button.
Magnetic
Pen Tool  .............Back
to top
Similar
to the lasso tool except that it draws a line instead of a selection.
Great for tracing.
Reselect
Command
.............Back
to top
Select > Reselect.
Gives you the last selection border you made in the current work session.
Transform
selection
.............Back
to top
Now you can
transform selection borders, not just images. You can rotate, reshape, and
resize paths and selection borders. To do this, go to the Selection menu
and choose Transform. Use the selection handles to resize the selection.
When you are finished, hit return.
Grid
and Guides
............Back
to top
The grid helps with alignment and layout of objects,
and the guides help align and crop objects. Both of these tools are found
under View menu.
You can choose to hide or show them. You can turn the "snapping" function
on or off. (Snap means that within a set number of pixels from the guide,
the object will "snap" to it).
Layers
............Back
to top
Layers are like sheets of tracing paper layered
over your image. In the layers palette, Window
> Show Layers, you can see the layers you have created.
You can only change information on the layer that is selected. Click on
the eye icon at the left to make a layer invisible.
Type
Layers

Any new text you enter is placed on its own
layer. Each of those layers is labeled according to the text on the layer.
Adjustment
Layers:
Go to the Layers palette and select "new adjustment
layer" or you can also go to Layer > adjustment
layer.
Adjustment layers work like filters. When you
remove them from your image, the original image remains. This means you
can make your tonal adjustments on layers separate from your image, so
they don't become permanent until you flatten the image (merge all the
layers).
To move a selection to a new layer, go
to the Layer menu at the top of the screen and choose "New via Cut" or
"Copy" This will either move or copy your selection to a new layer.
Aligning
Layers:
Now layers (and therefore text or objects on
separate layers) can be aligned individually to a selection border or
to each other.
To align a layer to a selection, make
the layer active, and under the layer menu, choose "align to selection".
To align two or more layers to each other, first link them by selecting
a layer and clicking in the box to the left of all layers you want to
link to it. (You will see the linking icon appear.) Next, go to the layer
menu and choose "align linked". You can use this method to align text
on the page to other text or to selections. While the text is linked,
you can move it as one block.
Layer
Effects:
In
the Layer palette you will now find a series of effects you can apply
to text or other objects on that layer, such as drop shadow, glow
effects, and others.
Merge
Down:
This
command in the Layers palette allows you to select a layer and merge
it with the one beneath it. You can change the order of the layers
to merge any two. Remember, though, that for adjustment layers to
work, they need to be above, or higher on the list, than the original
image.
Actions
.............Back
to top
This
function allows you to record a series of actions you intend to apply
to a number of files.
Creating
an action:
1.
Go to Window > Show Actions.
2. When you are ready to begin recording, go to "new action." Type in
a name and click record. As you work, your actions will be recorded.
3. When you are finished, click "stop recording". Now you can "play"
the actions from any point in the sequence, that is, apply them to another
file.
Applying
an action to a folder:
You
can apply the recorded actions to a folder of files, and all the files
will automatically go through the recorded actions. To do this, choose
"batch" from the actions palette menu. It will ask you to locate a source.
You can either find one on your hard drive or import files.
If
at any point in your sequence of actions, you need to make a selection
or plug in values you can insert a stop or a break point.
--To
add a stop, choose "insert stop" from the actions palette". You can
type a message to appear at the stopping point, to remind yourself of
what you need to do. If you want to include a continue button, in case
no adjustments are needed, check the "allow continue" button.
--To insert a break point, click in the column
to the left of the action. This will pause the action so that you
can type in a value, etc.
To exclude a command from the list of actions,
remove the check mark at the left of the command by clicking on it.
To
save a series of actions, choose Save Actions
from the actions palette menu. You can then choose Load
Actions whenever you want to apply those actions to a file.
The
History Palette
.............Back
to top
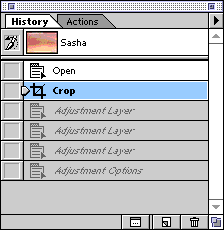
The
History Palette automatically records and lists everything you do in
Photoshop and allows you to revisit any previous state in the list.
All actions beginning with opening the file are recorded, and the most
recent action is highlighted. If you want to go back to any earlier
state, you can just click on that state. For example, if I decided after
making many adjustments that I didn't like the way they came out, I
can just go back to the step before, that, which was crop.
Linear
History
Using
linear history, which is the default, all the steps after crop are
grayed out. I can still go back to any of those states until I begin
to alter the image. When I choose a state and begin to alter the image,
my alterations are saved immediately beneath the state I have chosen
to work on, and the grayed out states are lost.

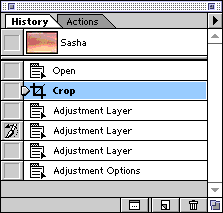
Nonlinear
History
On
the other hand, If I scroll down the History menu (arrow on the top
right of the window) to History Options, I can check the nonlinear
history mode. This mode allows me to go back to a previous state and
work on it without losing the states that follow it. For example,
with nonlinear history checked, if I go back to Crop, the states beneath
it do not gray out. If I begin to work on the Crop state, my changes
are recorded at the end of the list, underneath the last Adjustment
Layer state.
History
Brush
Working
in the nonlinear history mode allows me to use the History Brush,
another new tool in Photoshop 5. With nonlinear history checked, you
can choose any state ( I picked Crop), select the history brush and
click to the left of any other state. You can see that I have selected
the second Adjustment Layer. Now I can paint with that adjustment
layer on the state just after I cropped but before I made any adjustments.
You can choose brush sizes and shapes by going to Window > Show
Brushes.

Maximizing
Space in the History Palette
The
default number of saved states is 20. You can increase the amount
up to 99 in the History Options dialog box. Each saved state requires
lots of memory, so you probably won't want to go higher than 20. If
you are short on memory, you may actually want to decrease the number
of saved states.
To be efficient in saving the states that really matter, you may want
to delete states from the list that you know you won't return to.
For example, if I make a series of brushstrokes, each is saved separately.
If I consider them all a group, I can delete all but the final one,
and save room on the list for more important things.
Another way to save space in the palette is to take a "snapshot" of
crucial states of my image. These are saved independently of my 20
states.
Limitations
of the History Palette
Unfortunately,
the history palette is cleared when you quit the program. For this
reason, it is still necessary to save your documents often. I recommend
hitting command-S after each change you make. Also, before quitting
the program, be sure to save any of your snapshots as separate files
if you think you might want them later.
Channel
mixer
.............Back
to top
It
is often desirable to assign a separate transparent color to each of
two or three images so that when you combine them, you can easily identify
the areas where overlap occurs. The way to do this is to put each image
on its own color channel. The Channel Mixer automates this process,
and makes aligning the images much easier. Here is how to do it:
1.
Open your images. They should be saved
as TIFF and the mode should be set to grayscale. (Go to Image >
Mode and choose grayscale if this is not already the case). If
you have only two images to merge, open a third just as a placeholder.
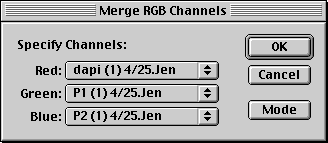
2.
Select one of the images and choose "merge channels"
from the channel palette menu.( Find channel palette under the Windows
menu, and then click on the arrow at the top right of the palette
to see options).
3.
Choose RGB color mode.

You
are then able to assign a color to each of your grayscale files. Click
on the scroll bars until the correct file is matched with the desired
channel. If you are using a placeholder for your third file, assign
it the extra color. When you are finished, click OK.

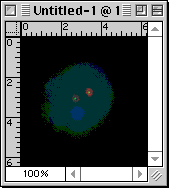
A
new file will be created with your images in separate color channels.

If
you are using a placeholder for a third file, you can now delete it.
To do this, select the channel, click with your move tool in the work
area, and choose command-a (or Edit > Select All). Then
click the delete button. The next step is to fill this area with black,
by selecting the entire work area with that channel selected, going
to the Edit menu, and choosing Fill > with black.
Once
your images are combined, you can select individual channels and use
Levels or Curves adjustments on them to vary the relative brightness
or contrast of that channel. If there is a lot of background noise
on a channel, a Levels adjustment can bring the background back to
black. (See
Tonal and Color Adjustments)
Back
to top |


