Inside WI
> Biocomputing
> Graphics
> Acrobat 5.0
Acrobat
5.0
Most people
know about Acrobat because you can open PDFs and fill in forms with it.
It can do these things, but is also capable of much more. This page will
explain how to navigate within the Acrobat program and how to edit and
create interactive PDFs with it.
Navigation.
.......back
to top ....
When
you open an existing PDF file, the viewing window is often split in
two. The left side is like a table of contents with "bookmarks"
to help you get to the desired section. Just click on one of these bookmarks
and the section you want will be displayed on the right.
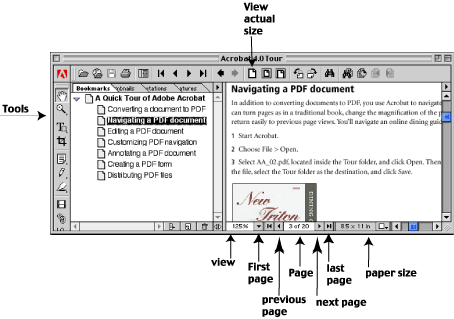
In the
example above, I'm using the Acrobat Tour PDF tutorial. This is a very
useful tutorial, so you might want to try it yourself. In the left window
you see a list of topics or bookmarks. I've highlighted "Navigating
a PDF Document" so that is what appears in the right window. At
the bottom you see some arrows that help you move forward and backward
through the document. At the top there is an icon that lets you view
the entire page within the viewing window. On the left is a column of
tools, which we will discuss below.
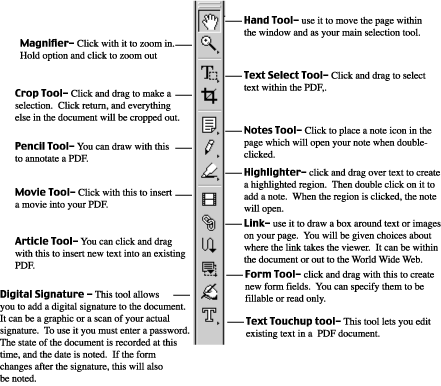
Toolbox.......back
to top
The tools
listed below let you access all the functionality of Acrobat.
Editing
Techniques
.......back
to top
The
following techniques are only available if you are the creator of the
PDF, or if the creator allowed the PDF to be edited. If the PDF was
designated as "Read Only" you will not be able to to do some
of these things.
Editing
text: Click
with the Text Touchup Tool  within the text of a PDF document. You can highlight text you wish to
edit.
within the text of a PDF document. You can highlight text you wish to
edit.
Insert
Pages: Go to the Document
menu and choose "Insert Pages". You will be given a window
in which to browse for the file you wish to insert. This can be a PDF
file or other file formats such as .TIF, .EPS, PICT, or the adobe formats,
.PSD and .AI.
Reorder
Pages:
You
can easily reorder pages by using "Thumbnails", a layout of
small icons representing each of your pages, similar to PowerPoint.
To see these icons, you first need to click on the arrow at the top
of the Thumbnail window, which drops down a menu. Choose "Create
all Thumbnails". Now you can use the hand tool to change the order
of pages.
Renumber
Pages: Go to the
Document window and choose "Go to Page". This will
take you the page at which you want the numbering to change. If you
want to begin the document at a new number, choose page 1. Now go to
Document > Number Pages, and select "Begin New Section".
Type in the desired number.
Creating
Bookmarks:
Use
the Text Select tool,  to select the text you wish to bookmark. This may be a section heading,
or other significant portion of the document. Click on the bookmarks
tab on the left of the screen, or go to Window > Show Bookmarks
if you don't see it there. Click on the arrow at the top right of
the window to pull down the bookmark menu. Choose "Create Bookmark".
to select the text you wish to bookmark. This may be a section heading,
or other significant portion of the document. Click on the bookmarks
tab on the left of the screen, or go to Window > Show Bookmarks
if you don't see it there. Click on the arrow at the top right of
the window to pull down the bookmark menu. Choose "Create Bookmark".
Making
Links:
You can make links in your PDF
file to addresses on the World Wide Web or just within your document.
Just draw a rectangle with the link tool  around the text or image you want to link. You can then specify the
type of link you want.
around the text or image you want to link. You can then specify the
type of link you want.
Annotations:
If you are sending papers between colleagues, you may want to make annotations
and mark up the text. You can draw on the PDF, highlight regions, and
insert notes which can then be read by the next viewer.
Notes:
this will add a note symbol which will show your note after the viewer
has double clicked on it.
1.
Go to File > Preferences> Annotations to insert your
name as the author of the note.
2.
Select the Notes tool 
3.
Click in the page and type your note.
4.
Choose Edit > Properties to choose a color and symbol if
there are multiple editors adding notes.
5.
Use the Hand tool  to double click on the note to make sure it opens as it should.
Marking
up Text:
You can use the highlighter  to
select text which will be highlighted with the color you choose. You
can draw circles and other editing symbols with the pencil to
select text which will be highlighted with the color you choose. You
can draw circles and other editing symbols with the pencil  .
Double click on each of these to add a note to the mark-up, which will
open when the viewer double clicks on it. .
Double click on each of these to add a note to the mark-up, which will
open when the viewer double clicks on it.
Forms
.......back
to top
Filling:
Forms
can only be edited if the author of the form has specified that the
form should be "fillable". If this is the case, you can use
the hand tool to click on a field in a form with the hand tool and begin
typing. You need the full version of Acrobat to do this, not just the
Reader.
Making
your own:
You
can use the Form Field Tool  to make your own forms. You can also make your own form fields on top
of the fields of a read-only document so that you don't have to retype
the entire form.
to make your own forms. You can also make your own form fields on top
of the fields of a read-only document so that you don't have to retype
the entire form.
1. First
go to File > Preferences > Forms Grid to choose a grid
to place the fields on. You can also make the fields snap to the grid
by going to View > Snap to grid.
2. Draw
a field with the form tool. Enter the name of the field and give the
border a color. Do not use the same name twice or the content of the
fields will also be the same.
3. You
can make a button to submit the form as outlined below.
Creating
Buttons .......back
to top
Sending
PDFs by email:
You
can add a PDF as an attachment to email, but you may want to compress
the file first so that it opens more quickly. You do this by checking
the "Optimize" box in the Save As dialog box.
Insert
Movie: When
you make a link to a movie file, (Quicktime for Mac), Acrobat doesn't
embed this in the program but makes a link to the file. It is very important
therefore to include the movie file when sending out the PDF.
1.
Use the movie tool to draw a box where you want to put the movie.
2.
In the dialog box, select the movie file you want to insert.
3.
Click "yes" to convert the file to cross-platform format.
(No conversion is needed for Windows movie files).
4.
You will have a few choices in this dialog box. These are the ones
I recommend:
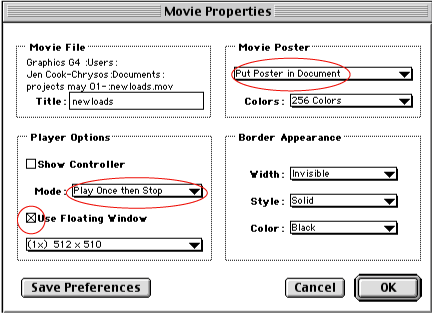
(Put
poster in document places the first frame of the movie inside the box
you drew with the movie tool as an icon where the viewer can click to
see the movie. Use Floating Window lets the movie play in its own window.
This way, if the movie size is large, it doesn't take up a lot of space
in your document. You should experiment with these settings to find
ones that work for your situation.)
Creating
a PDF from scanned documents .......back
to top
If you have a hard copy of a document you can scan it and make a PDF
from it. The easiest way is to scan through Acrobat instead of Photoshop.
To do this you need to copy the scanner plug in from your Photoshop
folder to your Acrobat folder. The correct location is Acrobat
> Scan > Plug-ins (Not Acrobat >Plug-ins
> Scan).
Once
you have installed the plug in and restarted your computer, you can
access the scanning software by going to
File > Import. Then the software
dialog box should look exactly as it did when you accessed it through
Photoshop. ***You should use the Epson
Twain plug-in, not the Silverfast one***
1.
For text only, use the line art setting. For black and white pictures,
choose 256 grayscale, and for color pictures, use full color.
2.
Choose 300 dpi for resolution
3.
Clean the glass on the scanning bed if necessary. Place the document
in the scanning bed. Make sure it is aligned properly.
4.
Use the scanner brightness controls if the letters look too thick
or too thin.
5.
Preview the page and make your selection as always. When you are ready,
scan the image.
6.
After the image is scanned, Acrobat will ask you to click "next"
or "done". If you have multiple pages, click "next"
and keep scanning until you are done. When you click "Done"
Acrobat will open the multi-page scan as an Image Only PDF document.
To
make your text searchable and editable:
If
you want to go the extra step to make the text active, and not just
a picture, (it will also look better):
1.
go to the Tools menu and choose Paper
Capture > Capture Pages. Acrobat will
perform Optical Character Recognition (OCR) on your file. You can select
all pages, current page only, or a range of pages. Acrobat will convert
your text from picture to active text.
2.
The OCR may not recognize some words. To check the accuracy of the conversion,
choose Tools > Paper Capture > Find
First Suspect. This is like a spell check.
Acrobat will present you with words that might not have been interpreted
properly. These will still be scanned text (not editable). The "suspect"
words will be enlarged so you can read them better, and highlighted
already within the text. Type in the correct word with the text touchup
tool , and then hit the Tab button to accept the word and and move to
the next suspect. Sometimes this works well, but other times not as
well.
back
to top
|
